Give Kopia an AI Brain
Kopia is a mature open-source backup engine — about 14.1k GitHub stars, Apache 2.0 licensed. It does content-addressed storage, incremental snapshots, dedup, end-to-end encryption, and backs up to S3, NAS, or local disk. Put simply: backing up files safely and efficiently is a problem Kopia already solved.
But Kopia is a backup engine, not a full backup management product: there’s no concept of “multiple hosts” — every machine runs its own CLI or KopiaUI, blind to the others. Even managing multiple repositories from one UI on a single machine has been an open request since 2023 (kopia/kopia#2976).
HyperFileLens doesn’t reinvent the backup engine — it adds a product layer on top of Kopia. Kopia still handles backup, dedup, encryption, Snapshot, and Restore. HyperFileLens pulls multiple hosts, storage targets, tasks, and snapshots into one web console, and collapses setup into three steps — register a host, configure backup and restore, start backing up. Ten minutes, no Repository, Policy, or CLI flags involved.
On top of that, HyperFileLens adds something Kopia never had: AI. It extends the chain from File → Snapshot to File → Snapshot → Search / Read / Reason → Answer — instead of manually hunting through snapshots and directories, you just ask in plain language, and the AI searches, reads, and reasons over the raw files (docs, spreadsheets, slides, images, code), returning an answer with a citation. It’s always reading the backup copy, never the live production data.
So HyperFileLens does two things: use Kopia for reliable backup, use AI to make that backup data useful again. This post runs through the whole chain from scratch — register a host, set up backup and restore, produce a snapshot, wire up AI, and end by asking questions about your own backed-up data.
What you’ll need
- A Linux host that can run Docker (x86; 4 cores / 8GB RAM is enough for small-scale use, 8 cores / 16GB RAM recommended for larger teams; 100GB disk), with outbound internet access to reach the model API — no public IP needed;
- An object storage account — anything S3-compatible works (Alibaba Cloud OSS, Huawei Cloud OBS, AWS S3, etc.);
- A host to back up — Linux, Windows, and macOS are all supported;
- Credentials for a language model. DeepSeek-V4-Flash is a good default; for image recognition, add DeepSeek’s latest multimodal model, DeepSeek-V4-Flash-Vision-Exp (model ID:
deepseek-v4-flash-vision-exp).
The whole flow: deploy HyperFileLens → back up your data → get insights from it.
Step 1: Set up the host and install HyperFileLens
| Item | Requirement |
|---|---|
| OS | Ubuntu 24.04 (x86_64) |
| CPU / RAM | 4 cores / 8GB for small-scale use; 8 cores / 16GB recommended for larger teams |
| Disk | 100GB (working space AI uses when processing files during Insights — scale up if you’re backing up more) |
| Network | Outbound internet access (to reach the model API); no public IP required |
| Ports | 11442–11445/TCP (11443 is the main console, 11444 is the model admin panel) — internal network only |
| Dependencies | Docker Engine 24.0.0+, Docker Compose V2 2.20.0+ |
SSH in, install Docker, then run the install script. If you’re in mainland China, GitHub itself is the bottleneck — the curl step needs to hit Gitee instead, since no --mirror flag fixes that:
Mainland China:
curl -fsSL \
  https://gitee.com/oneprolabs/hyperfilelens/raw/main/deploy/online/install.sh \
  | sudo bash -s -- --mirror cn --yes
Everywhere else:
curl -fsSL \
  https://raw.githubusercontent.com/oneprolabs/hyperfilelens/main/deploy/online/install.sh \
  | sudo bash -s -- --mirror global --yes
The installer prints two URLs and an initial email/password, using the host’s LAN IP. If the LAN IP is 172.30.164.250, you’ll see:
HyperFileLens · http://172.30.164.250:11443Platform Ops · http://172.30.164.250:11444
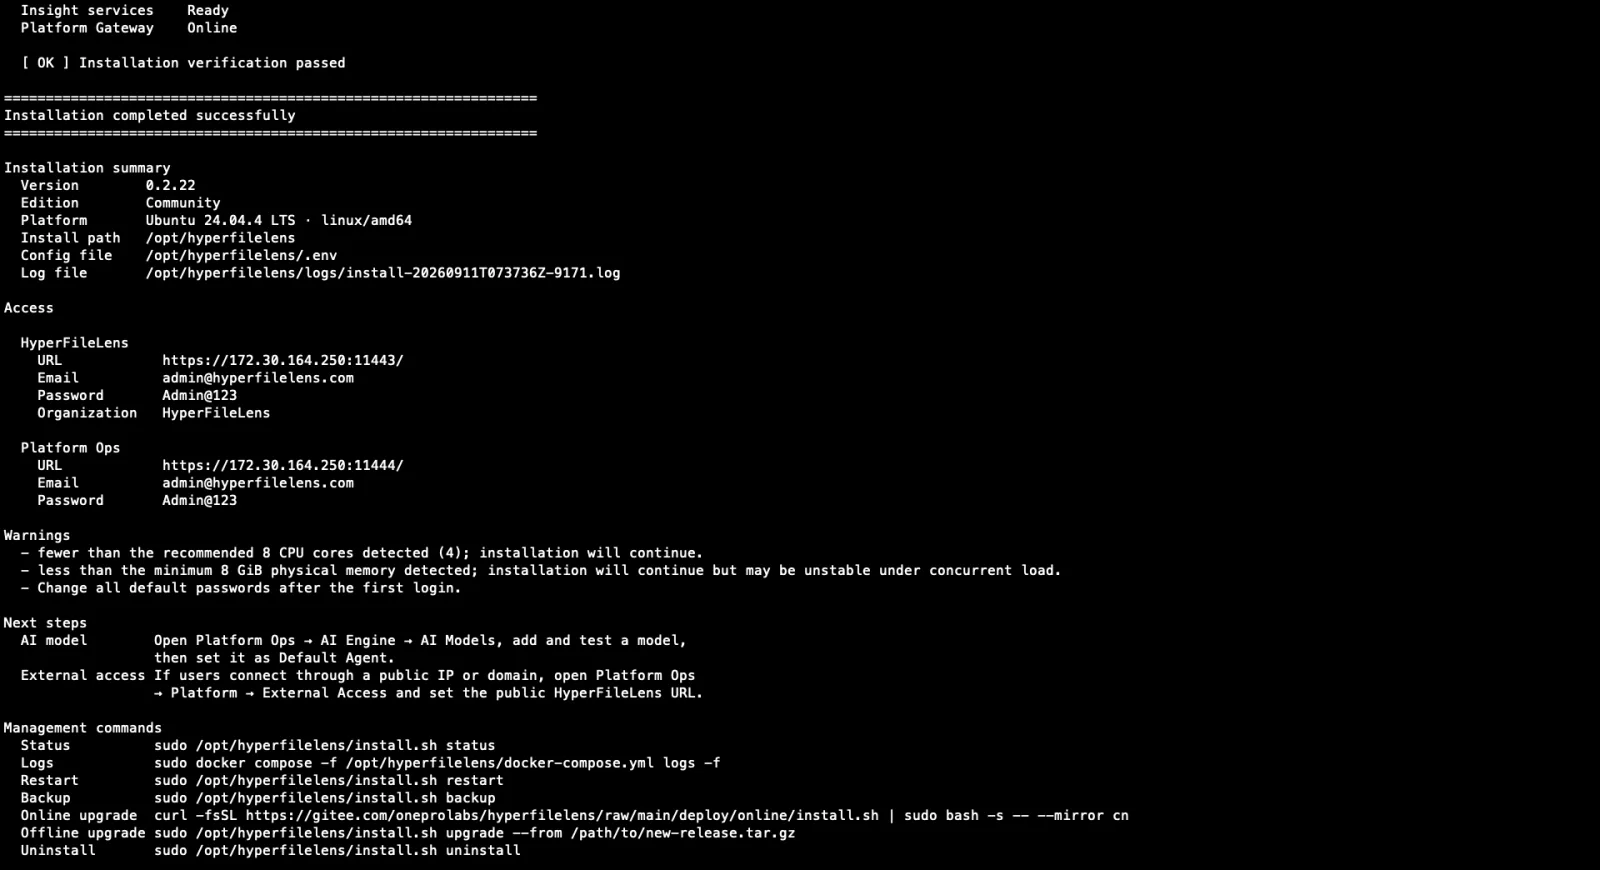
What the installer prints when it’s done
Open the 11443 address, sign in with that email and password, and change the password right away. Check the timezone matches the system clock while you’re there.
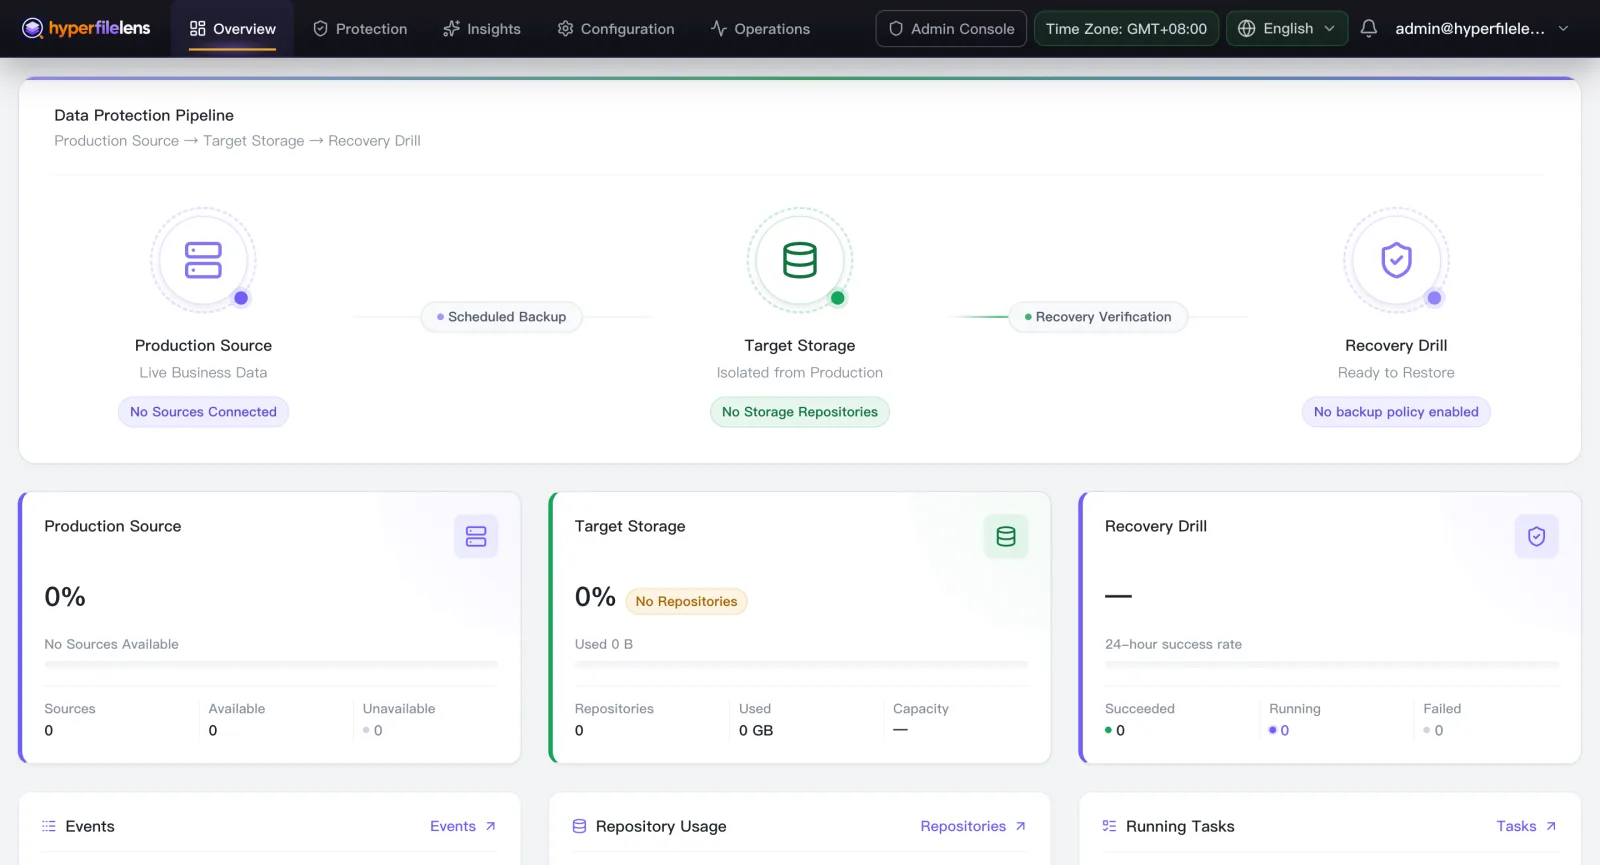
The console home page after logging in
Step 2: Set up the NAT-facing address and the AI model
Registering hosts, adding storage, and generating Agent install commands later all use this host’s externally reachable address; the AI assistant also needs a model configured before it’s usable. Neither is part of the backup flow itself, but both need to be done before you start adding data sources — change them later and you’ll have to re-register.
External access address: if this host is on public cloud, the installer prints the internal IP, but the address actually reachable from outside is the cloud provider’s NAT or public IP — fix that first. Open Platform Ops, go to External Access, and set it to the real reachable public address. If you’re only using this on a LAN, skip this step.
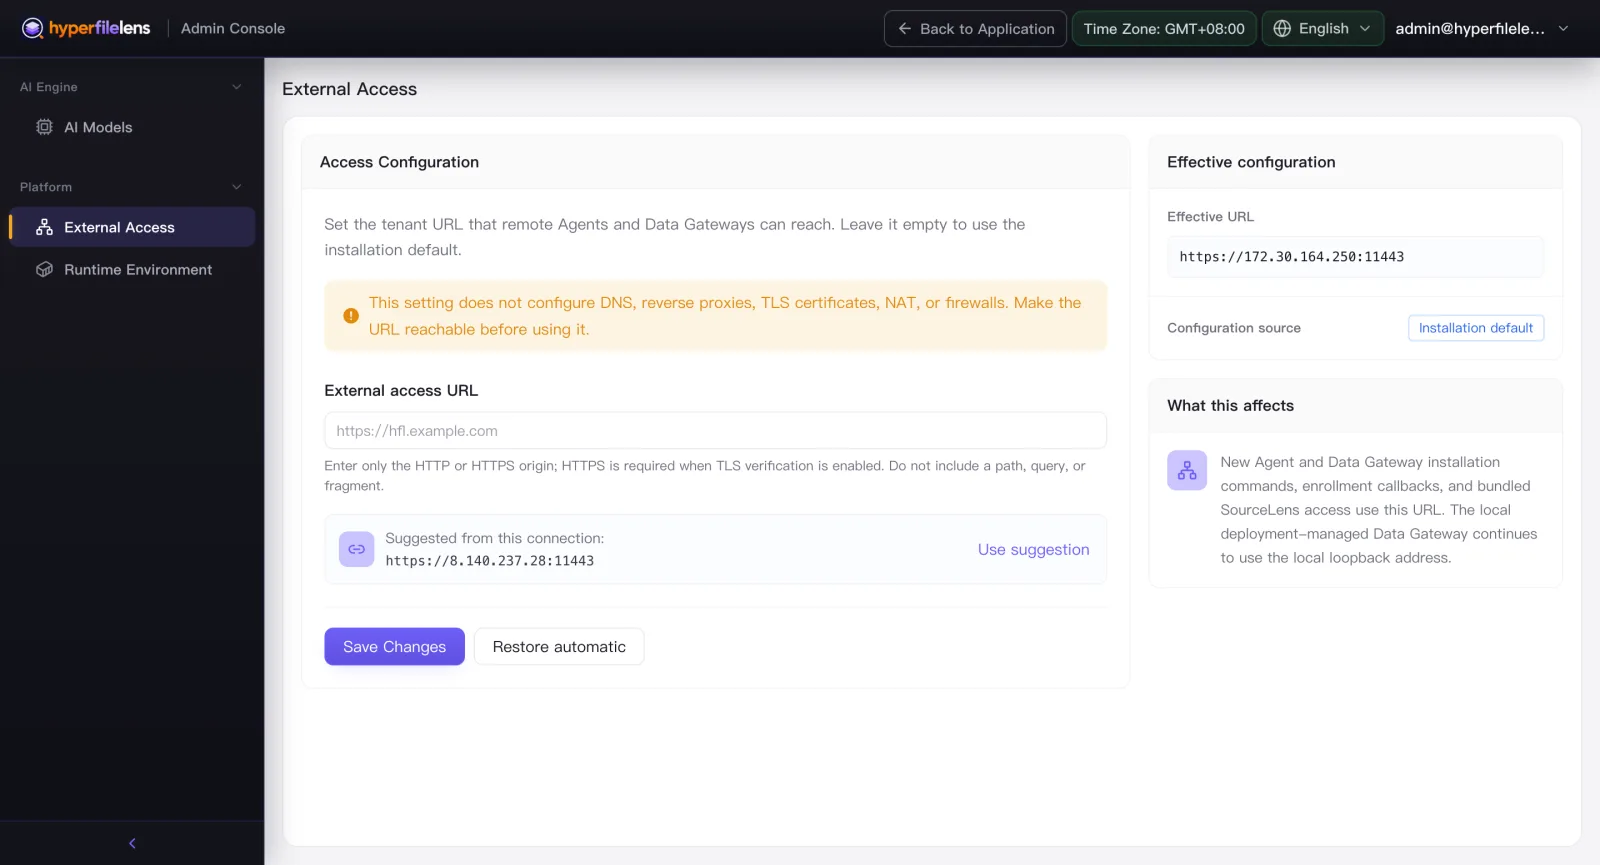
On public cloud, point external access at your public IP
AI model: still in Platform Ops, go to AI Engine → AI Models, click Add AI Model. DeepSeek is right there as a provider — no need to route through another gateway.
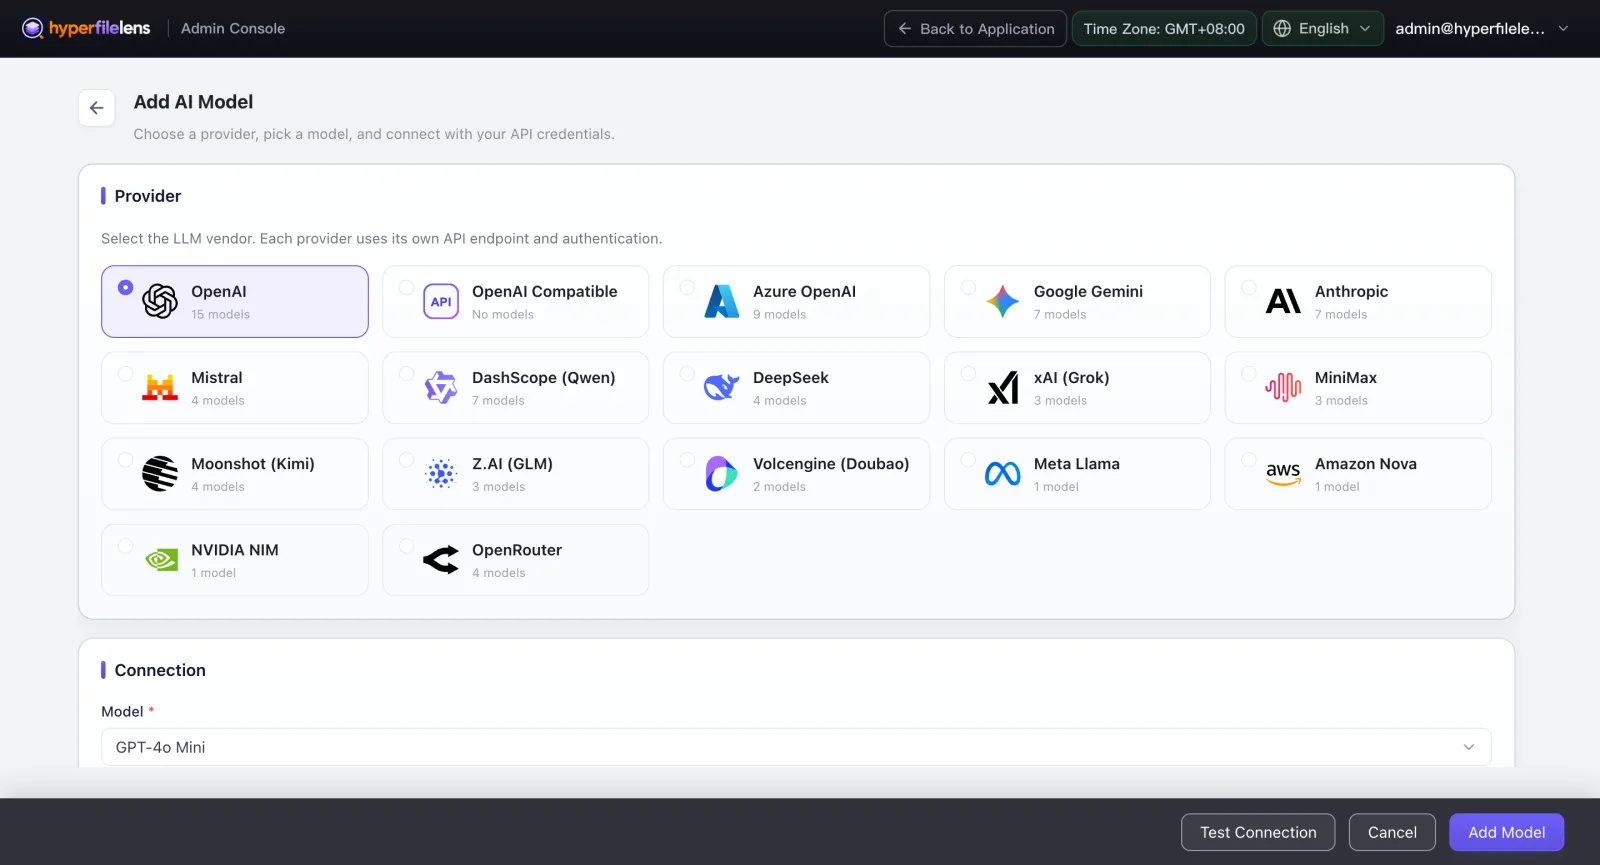
DeepSeek is right there in the provider list
Add DeepSeek-V4-Flash (model ID: deepseek-v4-flash) for text; if you need image recognition, add DeepSeek-V4-Flash-Vision-Exp (model ID: deepseek-v4-flash-vision-exp) too. Base URL is https://api.deepseek.com — set the API key, and save once Test Connection passes.
Step 3: Back up your data — add the host directory you want protected
Go to Protection → Backup Wizard, click Add Source, choose Source Host, and pick Linux as the OS (Windows and macOS work the same way).
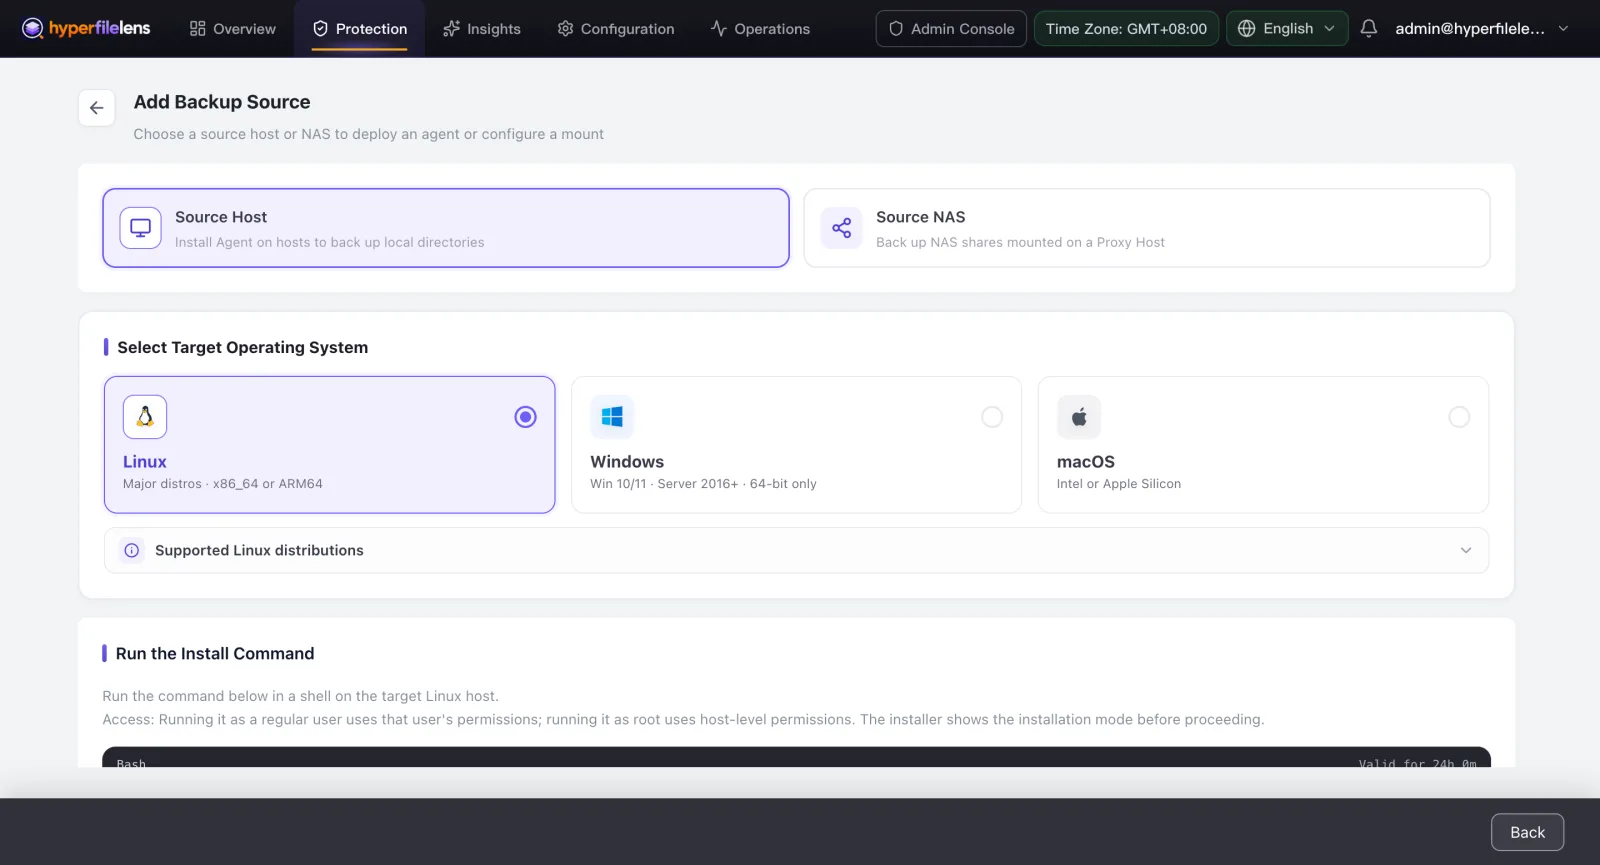
Pick the OS, copy the install command
It gives you an install command — copy it to the target host’s terminal and run it. Back in the Backup Wizard, refresh the source list and confirm the new host shows Registered and Online.
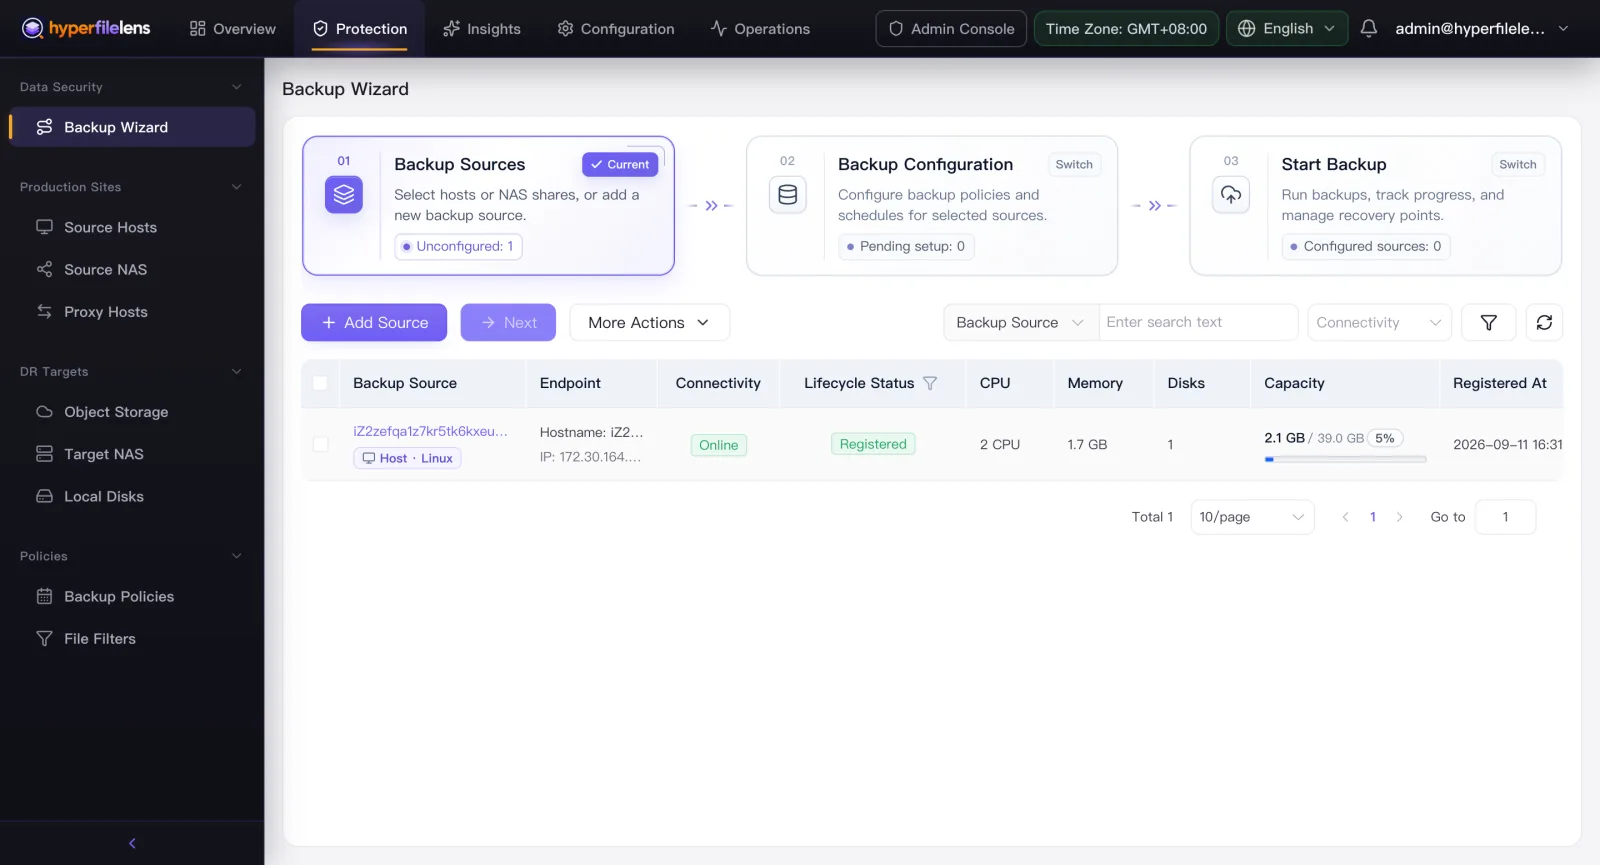
Host registered, showing online
Step 4: Backup setup
- Click Create Backup Configuration — a five-step wizard: Sources → Backup Policy → Target → Restore Plan → Review.
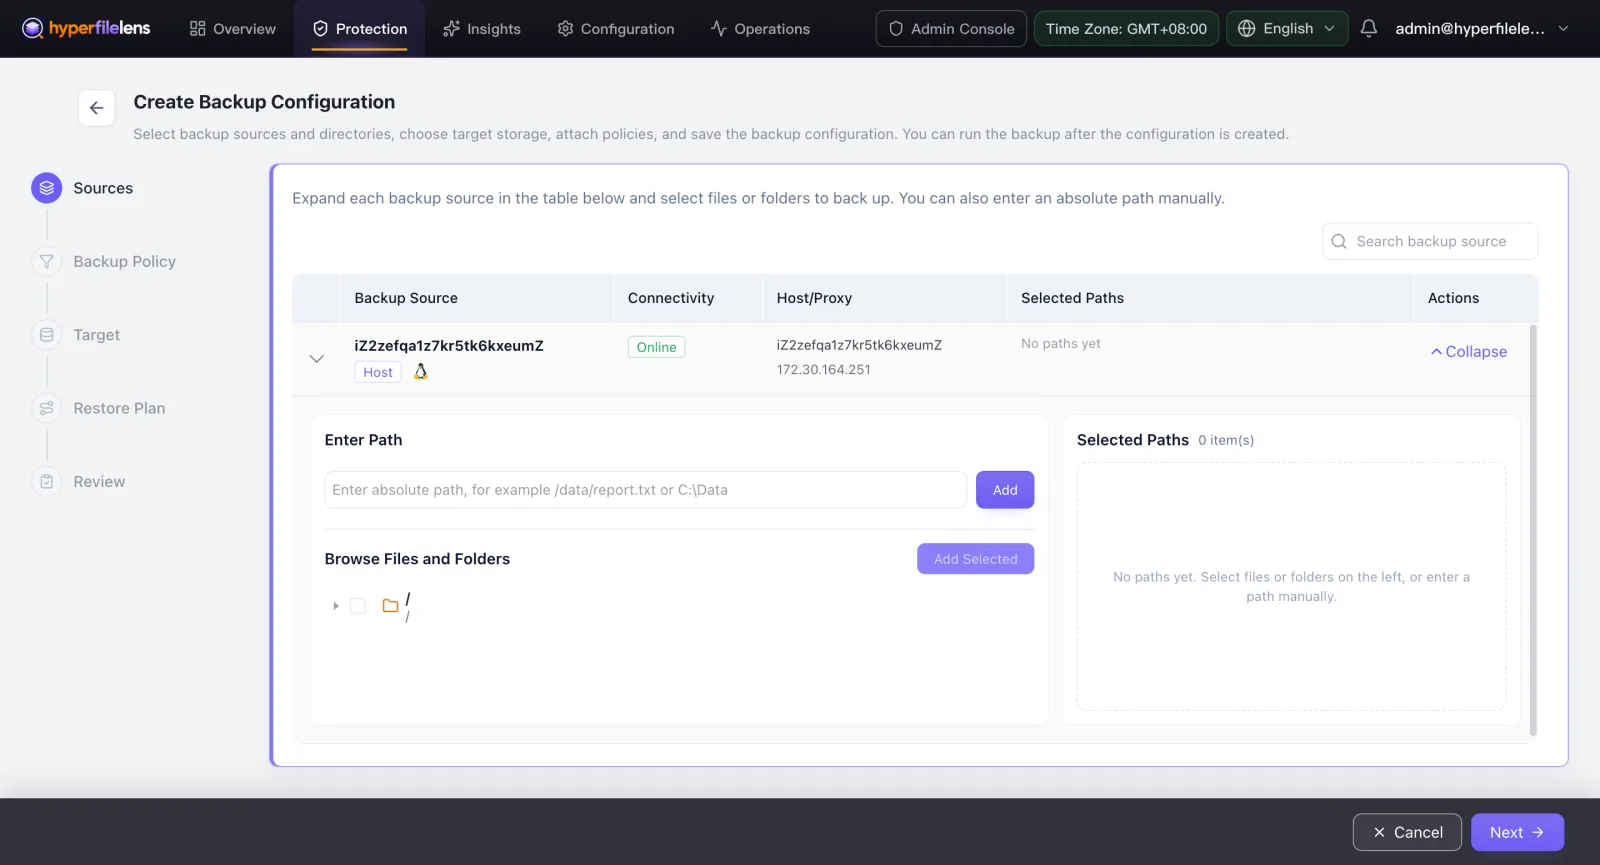
Create Backup Configuration: Sources → Backup Policy → Target → Restore Plan → Review
- The Target step needs an object storage repository: create a Bucket and a sub-account in your storage console (grant it only read/write/list on that Bucket), and get an Access Key / Secret Key. Back in HyperFileLens, click Add Object Storage Repository, pick a platform (Huawei Cloud / Alibaba Cloud / AWS have presets; anything else, pick S3-Compatible Storage), fill in the endpoint, region, AK/SK, bucket, and object prefix, then save and verify. The secret key is only shown once — don’t leave it in a screenshot anywhere.
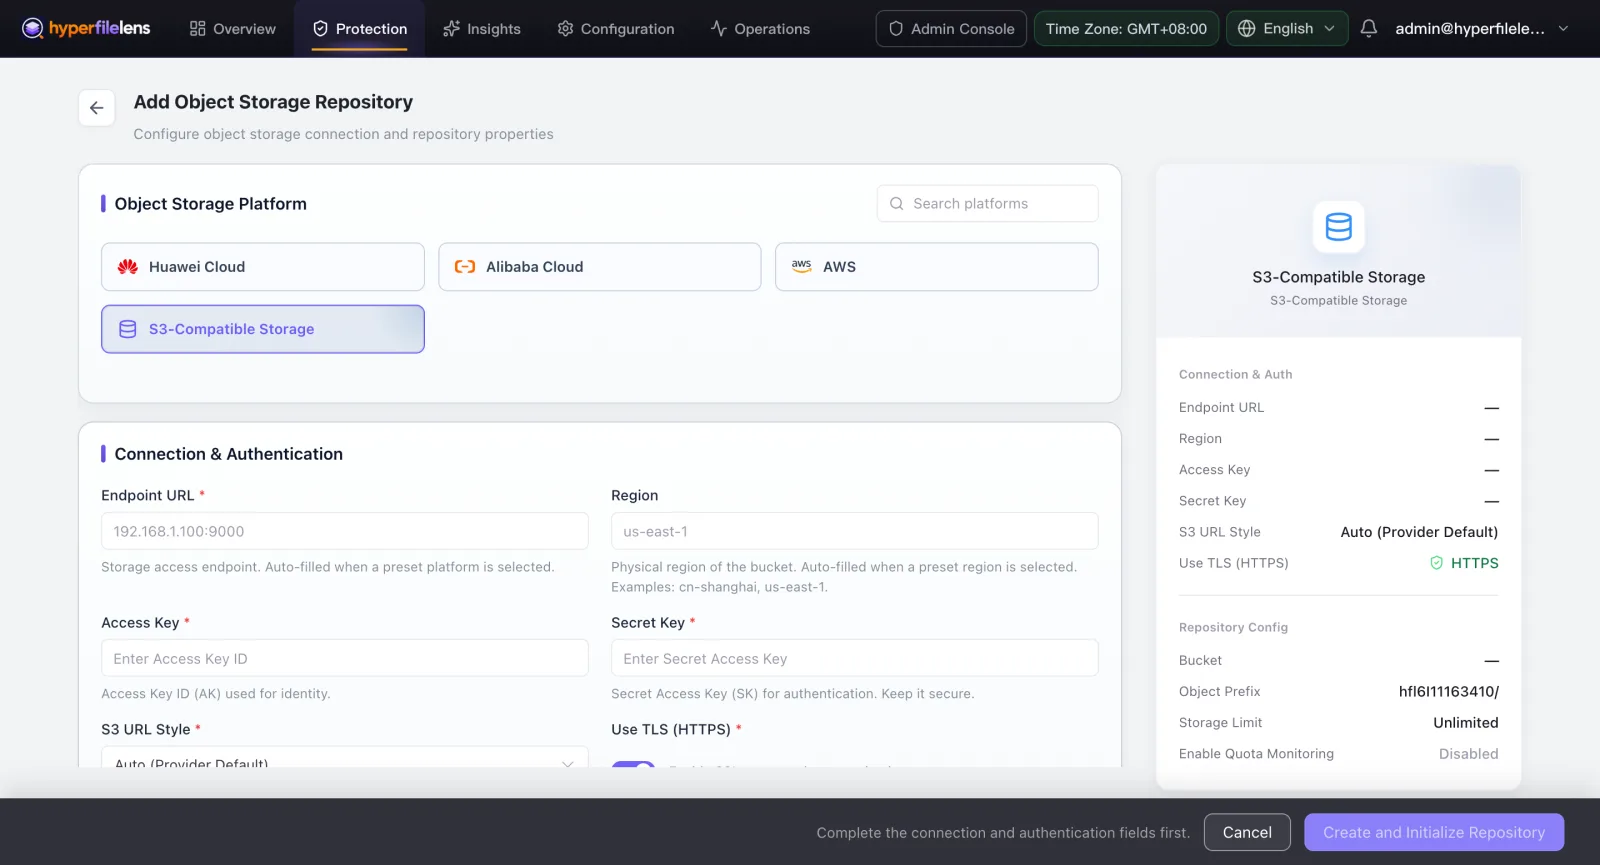
Pick any storage platform — the fields are mostly the same
Point Target at this repository, leave Backup Policy and Restore Plan on their defaults, and save on Review.
Click Backup Now, and wait for the status to hit Succeeded.
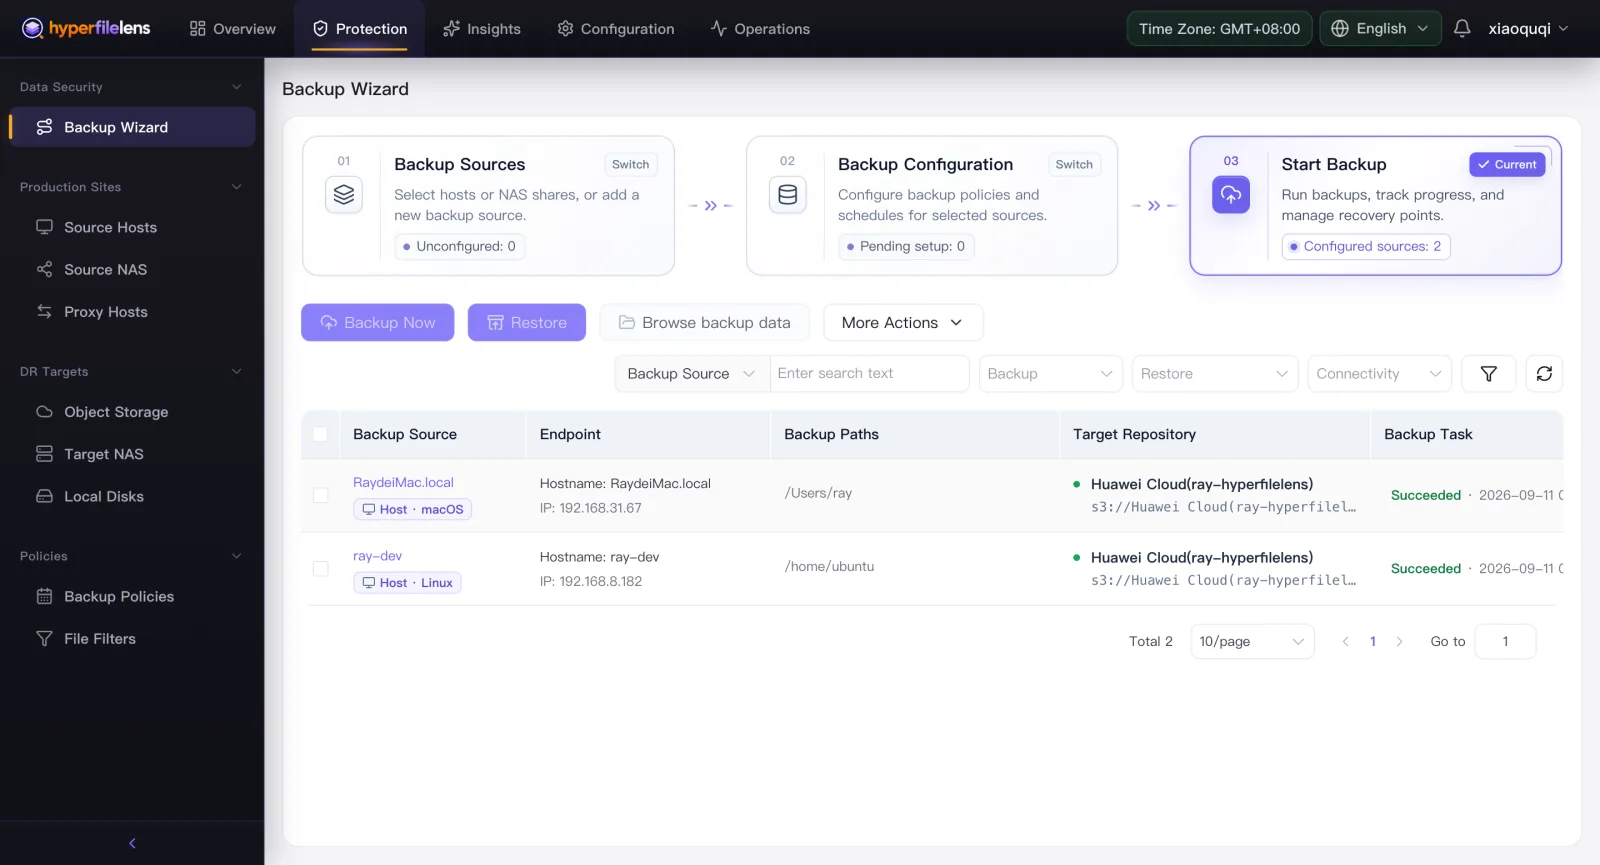
Backup task done, status Succeeded
Storage cost is basically negligible (Alibaba Cloud OSS standard storage runs around $0.017/GB per month). Egress only happens on restore: full the first time, incremental after that, so it’s small to begin with — and AI questions read from the already-restored copy, so they don’t trigger another download.
Step 5: Ask AI, see it work
The backup task shows Succeeded — no need to separately verify it. AI pulling the right answer out of the snapshot is the most direct proof it works. If you actually need to restore something, click Restore and follow the flow; not covered here.
Go to Insights → AI Copilot — you’ll see your chat history on the left. Click New Chat.
Pick a data source and snapshot, then add the files you want analyzed. PDF, DOCX, PPTX, and XLSX are all supported, and it recognizes images inside files as well as standalone image files — it’s working off the backup snapshot, not live production data. (This is why step 2 had you add a multimodal model — it makes recognition more accurate.)
Set the analysis type to Knowledge Q&A, and data privacy to Public Data Gateway (the platform’s own gateway — nothing extra to deploy).
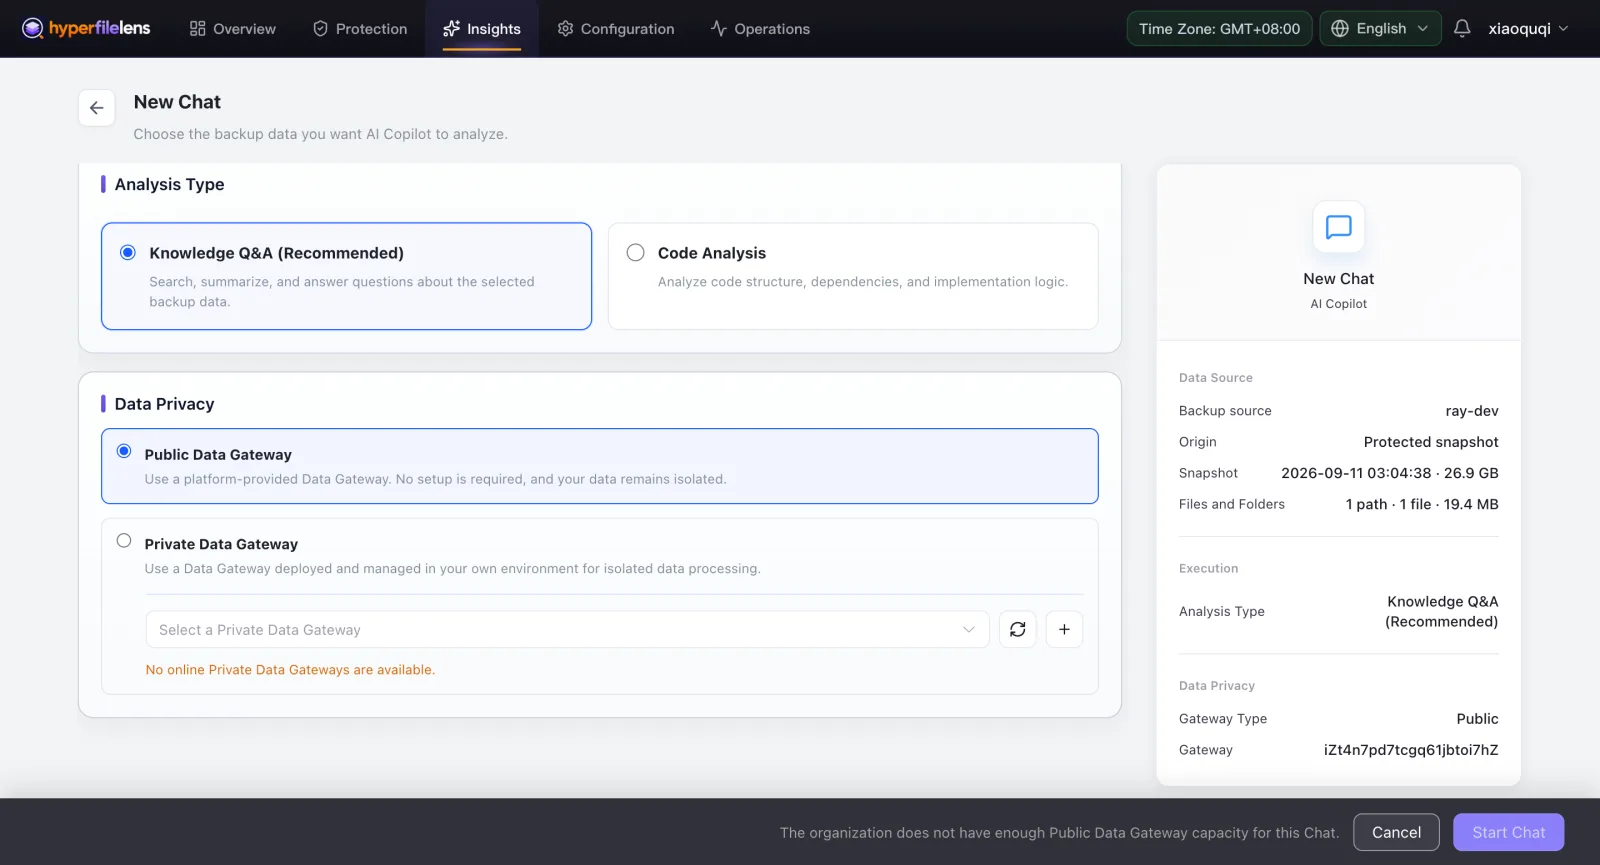
Knowledge Q&A for analysis type, Public Data Gateway for data privacy
Click Start Chat, and once it’s ready, just ask. Say you’ve backed up a copy of Journey to the West — you could ask: “Some demons want to eat Tang Sanzang’s flesh, others want to marry him — what’s the difference in what they’re after?” The AI answers straight from the backed-up file, with a citation back to the source.
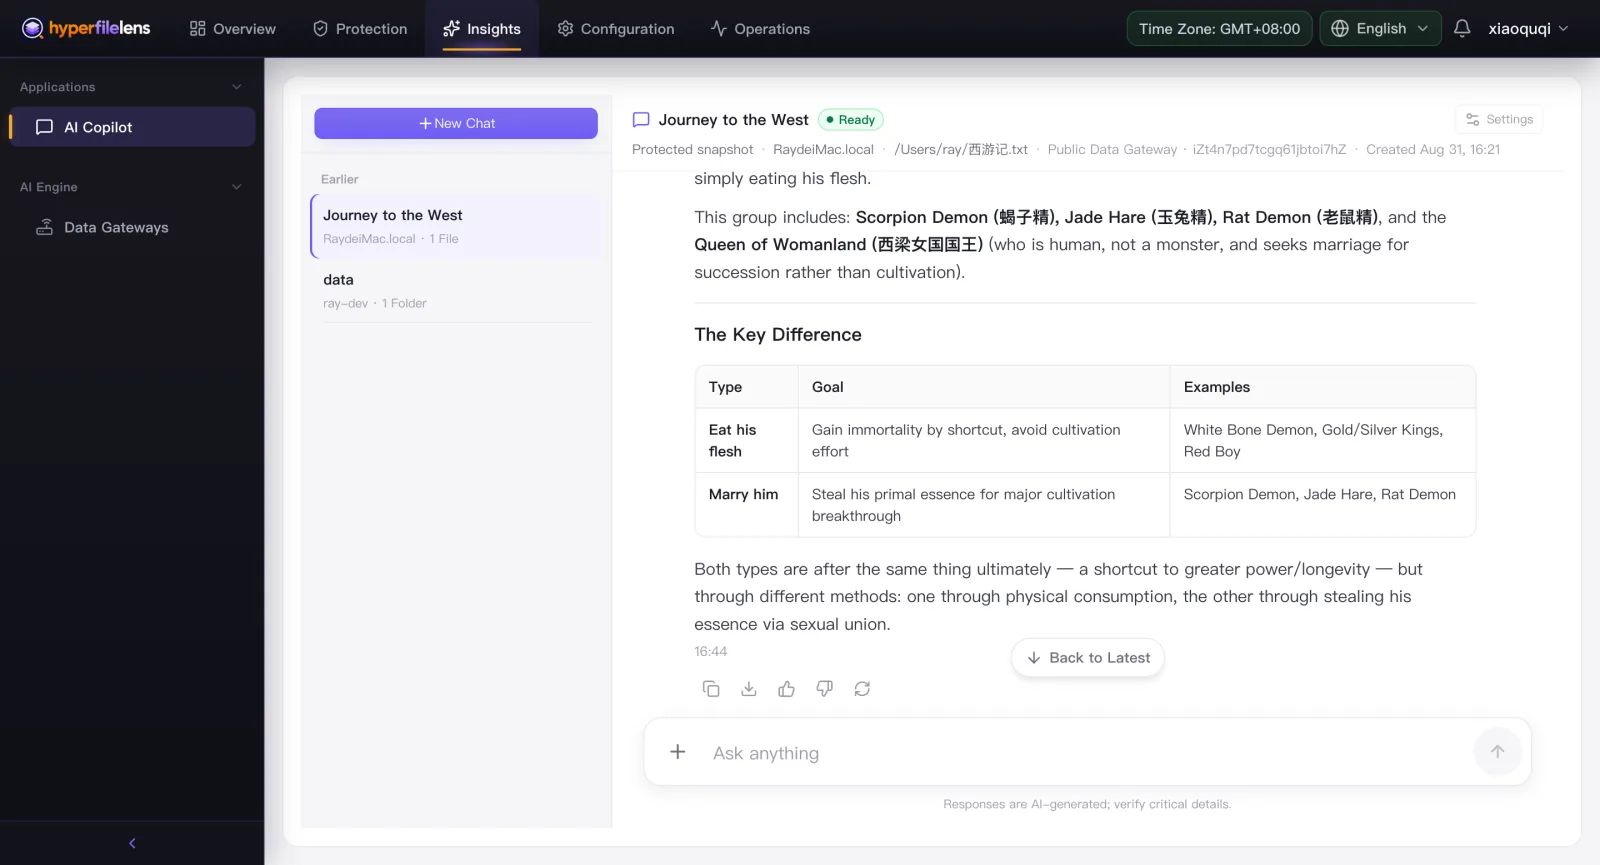
Ask a question directly against your backup — the answer cites its source
Kopia’s got a brain now
Kopia itself hasn’t been touched — dedup, encryption, and incremental backup all work exactly as before. What changed is the layer on top: you’re not checking status host by host on the command line anymore, setup is a few clicks instead of memorized flags, and backup data isn’t just sitting there waiting for a disaster — AI can read it, question it, reason about it, any time you want an answer.
Start to finish — deploy, back up, ask AI a question — this takes about an hour or two. After that, schedule the backups and forget about them.
Open Source
HyperFileLens is Apache 2.0 licensed:
- Main project: https://github.com/oneprolabs/hyperfilelens
- AI engine, SourceLens: https://github.com/oneprolabs/sourcelens
- Issues: https://github.com/oneprolabs/hyperfilelens/issues
Don’t want to self-host? The free SaaS version at https://hyperfilelens.com skips deployment entirely — just add a data source and go.
Join the OneProLabs Open-Source Community
Running into issues, want to contribute, or just want to talk shop about the project — find us here:
- GitHub: https://github.com/oneprolabs/hyperfilelens
- Twitter/X: @oneprolabs
If you use WeChat, you’re also welcome to join our WeChat group — just scan the QR code below with WeChat.

Scan with WeChat to join the OneProLabs group